
Microblading has become a highly sought-after method for achieving fuller, more defined eyebrows. Whether you’re looking to enhance sparse brows or simply improve their shape, understanding the steps in the microblading procedure is essential.
This article will guide you through the process step by step, ensuring you have a clear understanding of what to expect during your microblading session. If you’re considering this procedure, you’re in for a fantastic read that breaks down the journey to beautifully enhanced brows.
Step 1: Consultation
Why Consultation Is Necessary
Before the procedure begins, it is important to have a consultation with the technician. This step ensures that both you and the technician are aligned on expectations, and it allows the technician to assess your facial features and skin type.
- Discuss your desired brow shape, size, and colour.
- Assess your medical history, allergies, or skin conditions.
- Determine the best pigment colour and microblading technique suited to your skin tone.
- Map out the ideal brow shape based on your face structure.
What To Expect During The Consultation
- The technician will ask about your expectations for your new brows.
- They will check for any conditions that might affect the procedure (e.g., eczema or active acne).
- Your natural brow shape will be analysed, and adjustments to symmetry will be considered.
Step 2: Numbing The Area
Numbing Cream Application
The next step is to ensure your comfort throughout the process. Before starting the microblading, a numbing cream is applied to the brow area to reduce any potential discomfort.
- The numbing cream typically takes about 15-20 minutes to work.
- It ensures minimal pain during the application of the microblading strokes.
Why Numbing Is Important
- Microblading involves using a hand tool to create small cuts on the skin.
- Without numbing, the procedure could cause discomfort, making the process unpleasant.
- The numbing ensures that the client feels little to no pain during the procedure.
Step 3: Brow Design
Mapping Out The Brow Shape
Once the numbing cream has taken effect, the technician begins designing your new brows. This stage is all about creating symmetry and a shape that complements your face.
- The technician will use a pencil or mapping tool to outline the ideal shape of your brows.
- Adjustments are made to ensure that both brows are even and symmetrical.
Customising Your Look
- The technician will assess your natural brow hair growth direction and design the brows to blend seamlessly.
- A colour is chosen based on your hair and skin tone, making the final result look natural.
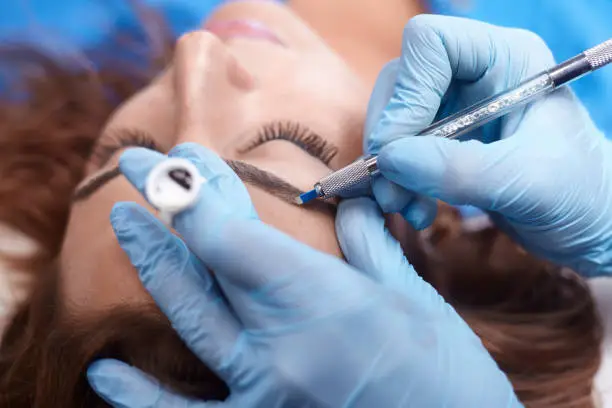
Step 4: Microblading Process
Creating Fine Hair Strokes
Once the design is finalised, the technician will proceed with the microblading itself. Using a hand tool, they create fine hair-like strokes to mimic the appearance of natural eyebrow hairs.
- The tool is used to make tiny, controlled cuts in the skin.
- The pigment is then deposited into the cuts to mimic natural hair growth.
Building The Colour
- The technician will apply multiple layers of pigment to ensure the brows have a rich, even colour.
- The strokes are placed in a way that follows the natural pattern of eyebrow hair growth, creating a realistic effect.
Step 5: Checking The Results
Assessing The Final Look
After the microblading is complete, the technician will check the results to ensure everything is even and that the colour has been set correctly.
- You’ll be asked to look at your brows in different lighting to see the full effect.
- Any final touch-ups will be done to perfect the look.
Why It’s Important To Check Results
- This ensures that any areas requiring adjustments can be addressed.
- The technician will also confirm that both brows are symmetrical and meet your expectations.
Step 6: Aftercare Instructions
Why Aftercare Is Crucial
Once the microblading procedure is complete, it is important to follow the aftercare instructions carefully to ensure proper healing and optimal results.
- Avoid getting the brow area wet for 7-10 days.
- Apply healing ointment to keep the area moisturised and prevent infection.
- Avoid scratching, picking, or rubbing the brows during the healing process.
Common Aftercare Guidelines
- Stay away from direct sunlight and tanning beds for a few weeks after the procedure.
- Refrain from using exfoliating products on the brow area.
- Keep your brow area clean and dry, especially during the first few days.
Step 7: Touch-Up Session
Why A Touch-Up Is Necessary
Most people require a touch-up session after the initial microblading to perfect the results and address any areas where the pigment may have faded.
- Typically scheduled 6-8 weeks after the initial session.
- The technician will assess how your brows have healed and make necessary adjustments.
What Happens During The Touch-Up
- The technician will go over areas where the pigment may have faded or where additional definition is needed.
- This session refines the shape and colour, ensuring long-lasting results.
Step 8: Long-Term Maintenance
Maintaining Your Microblading Results
Microblading results are semi-permanent, meaning they will fade over time. Long-term maintenance is essential for ensuring your brows continue to look great.
- Microblading typically lasts between 1 to 3 years, depending on factors like skin type and aftercare.
- Regular touch-ups will help maintain the desired look.
Factors Affecting The Longevity Of Microblading
- Oily skin tends to fade pigment faster, so individuals with this skin type may need touch-ups more often.
- Sun exposure and using products that exfoliate the skin can also accelerate fading.
- Proper aftercare can extend the life of your microblading results.
Conclusion
Understanding the steps involved in the microblading procedure can make a significant difference in your experience and the final outcome. From the initial consultation to the aftercare process, each stage plays a crucial role in achieving beautiful, natural-looking eyebrows. If you follow the steps carefully, you’ll enjoy flawless brows that last for months.
Frequently Asked Questions
How Long Does The Microblading Procedure Take?
The microblading procedure typically takes around 2-3 hours, including the consultation, numbing time, and the actual application of the pigment.
Is Microblading Painful?
Most clients experience minimal discomfort during the procedure thanks to the numbing cream. However, some people may feel a slight scratching sensation, which is usually tolerable.
How Long Does It Take For Microblading To Heal?
The healing process generally takes about 4-6 weeks. During this time, you should follow the aftercare instructions carefully to ensure optimal healing and avoid complications.